Taipei Bike Show 2010

This years show was pretty awesome with a wide scattering of bike and bike parts from big name brands down to much lesser unknown brands, and those without brands.

Although my primary focus is bikes, what I was aiming at with this show is to see just how well local companies manage to represent themselves to a worldwide audience. Not just to see what the big guys like Merida, Giant and Dahon are doing, but smaller guys who have carved out good niches for themselves.

Here’s the lowdown.

Amoeba Bikes

Amoeba bike

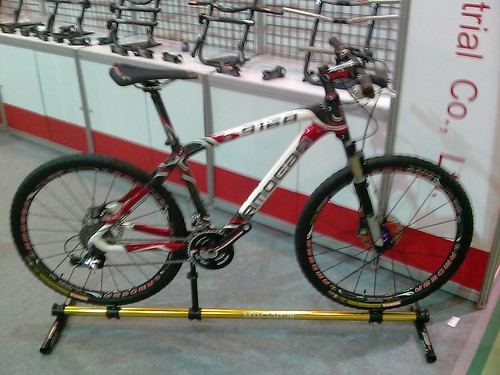
Amoeba make a whole host of bike stuff including handlebars, stems, bar ends, frames and other bits and pieces.

Amoeba are an example of a parts company that have really poured their efforts into their brand. I recognize this brand from years ago and even here at the show, the use of the manufacturing company’s name only appeared in some small places.

This emphasis on brand has, I think, given them a decent and permanent spot on the parts choice list of many riders.

Amoeba road bike

This is their road bike model.

Bear’s Bikes

Bears Bikes single speed bicycle

Bear’s Bikes is a local company making single speed bikes. These guys were sharing a portion of a booth with another company, but Bear’s were getting the vast majority of the attention.

Their stand was really well done. In a tiny space they managed to pack in just the right amount of bikes. They also have videos on the go of them and their buddies riding these bikes and doing all kinds of tricks and stuff. And the two guys manning the stand had intimate knowledge of their products, how they work and what they are good for.

This is a shining example of what can be done with a few contacts, enthusiasm and hard work. I’m not sure how well these bikes are selling, but they are riding on the wave of fixies and single speeds that seem to be doing the rounds at the moment. The main guy is also involved with Giant in some way, I can’t quite remember how.

They also have a bunch of videos on the Bear’s Bikes YouTube channel. Here’s my favorite one of the main dude doing some stuff that I would assume would break the bike.

Dodsun Bikes

Flat alloy bicycle fenders

The Dodson shown above features a Shimano Nexus hub and some pretty good looking, but probably extremely non-functional fenders. The more interesting bike was the one below.

Dodson classic style road bike

The bike shown above is their classic road bike frame. This was mated to what the sales guy called the Campagnolo ’59 commerative groupset, made in the likeness of their 1959 groupset.

It had a really retro feel to it, especially with those downtube shifters.

Dodson bike

Pictured above is a flat handlebar road bike from Dodson.

Favor Bikes

Favor Bikes fixie

Favor Bikes are a local frame and fork manufacturer, the bike pictured above is based around their Spun single speed frameset.

HydraKnight

HydraKnight backpacks

HydraKnight make bags, hydration kits and panniers. Although I don’t use a drinking bladder much anymore I used to use them all the time.

One of the primary things I like about local stuff is the price. I know the Camelbak was always a big investment of money, so I ended up using it for way longer than it was intended to be. My current Camelbak is over 10 years old.

The bladders are very solid and they incorporate some interesting designs. There is a bladder with two compartments inside so you can store an energy drink in one and water in the other, or any combination you can think of. The tubes from the two compartments are fed to a switch that selects which bladder to get liquid from, then goes to the section of pipe with the drinking thingy on the end.

The other cool thing was a range of very waterproof bags for commuting and touring. They come in different sizes and also include a handlebar bag that’s also waterproof.

Nankon Bikes

Nankon long tail cargo bike

This long tailed cargo bike from Nankon was one of the highlights for me.

I have had my eyes on this style of bike for a long time now. With two kids it’s a bit of a mission to do any riding with them and I don’t have a bike setup quite right to take them both at the moment. Also the pricing on these is pretty expensive, with the well-known Surley Big Dummy cargo bike going for over US$2,495 as a full bike. This one would appear to be in a better price range and it’s made with aluminum rather than chromoly.

I’m hoping to get to try this one out sometime after I get in contact with them again.

Nankon cyclocross bike

The cyclocross offering from Nankon.

Girly Single Speed

Nifty fixie

This was propped up against a wall, I have no idea what company makes it but it looks pretty flash. The mix of the red aerospoke on the front, deep section white rim on the rear and gold cranks and handlebars are really stylish.

Free Parable

Bike trailer and suitcase in one

“Smart Low-Tech” is the moto of the folks at Free Parable. Based in Kaohsiung they design stuff for bikes.

Pictured above is the T1, which is a suitcase/trailer. When the wheels are folded up they are just like the little wheels on a normal suitcase. When they’re folded down they are read to act as a trailer that easily clips to an attachment on the quick release.

They also have what I’d like to call an inverted waterbottle holder. Instead of putting the bottle into a cage, you put an attachment onto the bottle itself, that attachment then clips to the parts on the bike. This allows any standard bottle to be clipped onto the bike.

Lastly was the Monkii, which is a folding tool carrier.

Polar

Taipei Bicycle Show girl

Sorry, couldn’t help myself.

Of course no show in Taiwan is complete without the scantily clad girls. Unlike Computex though, they were few and far between, and most of them were for slightly less heard of local or Chinese brands (it’s a local thing).

The lady above was a bit surprising as she was modelling for Polar, but it looks like all their stuff is made here. Polar are best known for their range of hear rate monitors.

Lian Hang New Product

Taipei Bicycle Show girls

These two were dressed just like the computex ladies, those shiny, plastic skirts and tops. Okay, okay these are my only pics of girls.

A Great Show Overall

After seven hours at the show I still only managed to get a good look at and talk to about 20% of the exhibitors, another 15% were just quick looks without talking to anyone.

Next time I hope to get more time to check everything out better. I was really impressed with the whole layout of the show and was amazed at how great it is go on a trade day as opposed to the weekend where it’s just a madhouse.

My First Impressions of the Dahon Speed Comp

Well over the weekend I managed to get hold of my first real folding bike. The impression so far has been good, but many of my concerns about these small bikes are still there.

My only experience with folding bikes in the past was a sub-NTD2000 ($60) bike which was kinda fun, but so flexy and small that it was no good for any distance further than the end of the block. That gave me the impression that they’re all like that.

I was wrong. Here’s why.

First Impression

The first thing I noticed is that the bike is pretty light, with everything smaller than a normal bike it ends up being on the light side. It’s not as light as a well-specced road bike, but for a small frame made from 4130 chromoly and a seatpost to match, there is a good balance.

I was going to talk about body position and setup on such a small bike, but will save that for a later post.

All that I need to say for now is that for commuting it is a comfy position. I’ve set the handlebars to the same height as the saddle, which is a little more relaxed than my main bike.

Overview

The bike features the following bits and pieces:

  • folding frame (made of Chromoly 4130)
  • foldable pedals
  • double chainring (39/56)
  • eight speed rear cassette (with MTB ratio)
  • grip shift (three speed front shifter for only two chainrings? odd.)
  • 16″ wheels
  • front and rear fenders
  • straight-pull brakes
  • dia-compe levers
  • ergonomic grips
  • curvy downhill-style handlebars (with less width)
  • massive, long seatpost
  • saddle with beam
  • rear rack
  • front/rear reflectors

Gearing

With two chainrings up front and an 8-speed MTB cassette at the rear, you get 16 gears to choose from. Plenty for city riding and commuting. These give a lot of range for climbing some smallish hills and moving along at cruising pace of up to 40km/h.

But I have a gripe. Of course I do.

Through the city I usually maintain a 20-25km/h pace, which is a balance between not going too slowly and not breaking into a torrential downpour of sweat. At this speed I am firmly in the bigger chainring and shifting amongst the middle cogs at the back.

But the mountain bike cassette has too much range. The lowest combination on this bike would be suitable climbing very steep hills, and I mean spinning the cranks while going at 5km/h sort of hills.

Just not necessary.

I’d rather have a road cassette with much closer gears for a lot of variety in the 13-28km/h range. The gaps between gears at the moment are just a bit too big.

With that said, the gearing all works as advertised. The front shifting is very stiff and takes a heavy twist to get to the big chainring. The rear shifting is smooth and precise.

Handling

There is inherently less stability when using smaller wheels. That’s one of those scientific things that teams of people in lab coats have spent years analyzing and found to be true.

Larger wheels roll better, roll over bumps better, give slightly better power output and are more stable at speed. Smaller wheels are lighter and more maneuverable.

I was actually expecting the steering and handling to be worse than it turned out to be.

My unscientific test (I should get a lab coat for authority) of stability is riding hands free. That balancing turned out to be very difficult, but doable. On an MTB or road bike you can keep riding without hands until you run out of road or trail. The effort to stay upright was almost not worth it as the constant counter balancing was very tiring. It is still doable however.

It should also be noted that one side effect of the small wheels is that although the overall size can okay after adjustment you are still perched very high the wheel hubs, which might be a contributing factor in the lowered stability. But that is inherent in the design, so I can’t really fault it for that.

Bumps are not fun and the super long stem and seatpost amplify the effect of stutter bumps on roads. Even at a measly 25km/h I felt something would break or I’d lose control. The leverage makes those bumps very much bigger and I’d warn you to ride them carefully, something akin to the lightweight riding style for cross-country mountain biking would do fine.

Braking

Well, I stopped. Good enough?

Not quite. The little wheels are not perfectly round which is not unusual for many wheels. They take a pounding over time, they’re not built quite right and they just end up slightly unround or not straight.

Unfortunately the same leverage that comes through when hitting bumps also comes through when braking. Just a small imperfection in the rims makes the braking very stuttery. This is mostly solved with a good wheel truing. If you can do that yourself, great, if not, it might be worth having a decent wheelbuilder tension the spokes correctly and work out any slight imperfections in the wheels before putting the bike into heavy use.

Having become accustomed to the feel and power of disk brakes, these do feel a little less powerful, but great for the slower speeds the bike is intended for.

Folding

I still haven’t figured it out.

I tried without the manual and was a little confused. “It’s not really that small,” was my first thought.

Well, as it turns out I’ve only had to fold it twice so far. Claimed folding time is less than two minutes.

I still have a soft spot for the Strida folding bike simply because of its super foldability. This doesn’t fold up as easily as the Strida’s 15 seconds, nor as small, but does give a range of gears that the Strida doesn’t.

Comfort

The ergonomic grips were good on my hands, giving support where needed.

The saddle is soft enough and well designed. Softer than a race seat, but not a big cushion. I’d say it’s a racing-shaped seat with cushion-like padding. Comfortable after and hour of riding.

The riding position is relaxed. If it doesn’t feel relaxed, get your local bike shop to help you out with that.

Who is this bike for?

Considering the makeup of the components and the price and quality of the bike, it would be ideal for a regular commuter who covers up to 10km on their daily commute.

It’s not a cheap bike, which puts it out of the bargain bike range, but it won’t be suitable for longer riding like touring. Big bikes are always more comfortable for longer rides, but if regular folding and transporting on public transport is required, this bike would do the trick and do it comfortably.

Step Into the Light – A Short Guide to Bike Lights

Bicycle Christmas lights -- drivetrain

After two rides that ended up in total darkness it’s about time I took a look at lights.

Lights have become an accessory for bikes. Years ago it wasn’t like that.

When you buy a car or motorbike no-one says, “Would you like lights with that?” Somehow it has fallen out of fashion to have lights on bikes, when in fact they are very useful and a very important part of night-riding safety.

Why no lights?

The reason there are no lights most likely comes down to fashion.

As bikes became more and more hi-tech and racers migrated from being great all-round athletes who would go huge distances without support so the bikes adapted to meet that purpose. People would inevitably want a bike like their favorite rider, so slowly the “cool” bikes were made without adequate clearance for fenders (or even slightly wider tires), without eyelets for racks and without lights as standard.

So the vast majority started to do without them and now they have become an add-on part, not considered as part of a standard bike.

Which is a bit of a pity.

It keeps people from riding at night because you have to get something else to make it safe. That then means more expense which most people don’t really need.

So if you want to ride at night anywhere outside the city, where that inescapable glow starts to disappear, then you better get some. Although the options are not huge, there is a lot of quality stuff around, for the best you’d have to do some searching though.

Which lights?

The answer seemed pretty obvious to me before: whatever they sell at the bike shop.

But this does not start to cover the vast range of lights for those who spend more than just a few hours riding their bikes at night each year.

My typical setup in the past has been (usually Cateye brand)…

  • Front light – usually with 3 or 4 batteries, previously halogen bulbs, more recent years it’s LED
  • Rear flashing light – 3 to 5 LED lights, usually powered by 2 batteries

A full charge will give quite a few bright hours on the front light and many more hours of “just enough”. The rear one will flash for a lot longer before needing replacement.

Beyond these I have had a dual-light with big rechargeable battery before which gave a decent amount of light for a pitch-black 5km tunnel ride before the tunnel was officially opened. Being of the older Halogen-bulb sort, the battery would not even last two hours with both lights on.

Enter the dynamo

schmidt dynamo hub

In Germany, every bike sold is required to have a dynamo (front hub that generates electricity) and front and rear lights. And that is by law. And enforced.

So that’s a good place to start.

Having to install these things on every bike for such a long time, a huge number of high-quality front hub dynamos are produced in Germany.

The first thing that came to mind was exploding lightbulbs. But thanks to much improved technology and electronics the better dynamos will not destroy any lights as they are limited by electrical circuits and the power produced is smoothed off too.

They’ve also become more efficient. Almost to the point where it would not be noticeable. I mean like less then 5 minutes lost through inefficiency for every ten hours of riding, and for the amount of light they can produce it beats carrying a big, fat, heavy battery for the whole trip. You’re also saving the environment by saving batteries and you get that tingly feeling of self-sufficiency.

Lights

B&M Lumotec Plus

Along with everything else, the lights have taken a few big steps in their efficiency and maximum output potential. The most notable difference is the introduction of LEDs. With up to 50,000 hours of use compared to a few hundred hours for halogen bulbs, there is a lot to like. They also use less power than halogens.

They also come in a huge range of shapes and sizes too most of my information comes from Peter White Cycles headlight page where he covers the spill of the lights and a lot of information for anyone looking to compare lights.

For the moment

I am still to pour any big amount of money into lights. That was my intention, but I’ve been less drawn to investigating recently.

The main drawback has been the price. Most of these products are from smaller companies who specialize in these parts, which makes them expensive, or at least out of touch with the currency of Taiwan. For some items the price is only suitable for an enthusiast with money to spare.

So if you’re doing any night riding, make sure you’re kitted out with the right lights for your rig.

The Broken Seatpost

I take a long time to learn my lesson.

There are plenty of documented times when bike maintenance should have been done, but didn’t get done, resulting in a not-so-good ride. There are other times when I’ve done some slightly crazier offroad riding and broken parts, which is to be expected, and that is all in good fun.

But this time the blame falls squarely on crappy bike parts.

The Start

I was heading off on a ride early in the morning, I started at 4:15, which was a little later than planned, but that’s par for the course.

The destination was the 600m peak of the hill between Shrding and Pinglin on the 106A. To get there I had to head off towards Nangang, pass by Academia Sinica Road then head on.

Now, the most obvious way to Shrding is by going over the 109, but I wanted to try something new. With Google street view on hand I planned a decent looking route over a smaller road that would achieve the same elevation, but add some variety to my ride.

A Little Lost

The main turnoff to the road up the hill was where the Google car had decided to go the other way, so I was on my own to figure out which roads went where.

I made it through the first intersection unscathed, keeping to the left and avoiding a detour to a deadend in the middle of nowhere. But my luck would change.

Later I was faced with a similar choice.

The road to the right didn’t seem to have any more lights while the road that dropped sharply to the left was well lit. So I took the path down.

Grab a Fistful

Something I love about roads in Taiwan is that there is no maximum grade. If that’s where the road has to go, then that’s where it has to go.

Back in South Africa there were some steep hills, but they were all limited in how much they would challenge my breaks when needed.

So on the way down this “little” road down I ended up braking so hard that I had to carefully alternate front and rear brakes to give them time to recover from the glazing over that occurs during heavy, continuous braking.

And…

It was the wrong turn…

just a dead end…

should’ve taken the other turn, so I had to slog back up after trying to check my location on the map (BTW a map on your phone is only really useful if you have a GPS to pinpoint your location, duh, I don’t have a GPS).

So up I went, kept following the road, the lights returned and then I started heading down.

The Bang

Riding in the dark requires and abnormal amount of trust in the state of the road you are riding on.

Very few bike lights will light up enough road to allow for evasive maneuvers when travelling at 30kmph+

So I was following the road as usual, keeping to the parts of the road I could see, or at the very least not riding off the edge of the road.

When I spotted a construction team I had to change tact and move left into a darker area….

Whack…

Slide…

Quick recover…

Although my front wheel made a big move to the right I did manage to stabilize and continue.

But something wasn’t right. The saddle felt strange. I put it down to the seat being shifted slightly during the little incident that just occurred. I continued, and finished a wonderful ride to the top of the big hill.

Holiday Time!

So I headed back to the office and went off to the Taipei main station for a slightly early holiday (on a Thursday, a got the day wrong in the video).

Disassembling my bike outside the bus terminal and shock and horror I see my seatpost is bent, no quick realignment of the saddle needed, but a full replacement of the seatpost. And this is the third one I’ve had that’s bent, just none of the others have bent so far.

The insanity is that until more recently Giant have insisted on installing 27.2mm seatposts with a big old shim, whereas the inner diameter of the seat tube is actually made for a 30.9mm seatpot without a shim. Dumb, dumb, dumb, raise the skinny one to a height suitable for me, put my fat ass on the saddle and the poor seatpost doesn’t have a chance.

Well, all should be good and well in seatpost land from now on.

Here’s hoping.

My Coldest Ride Ever

On Tuesday morning I went on the coldest ride I have ever done, at the point where I finally gave up and headed home I was actually feeling a bit scared. So how did I get into this mess?

Not So Good Preparation

Continuing with my efforts to make myself weather-proof I went to the motorbike store to buy a set of waterproof jacket plus pants. Not really suitable for warm weather as they hold the heat in too much I figured they would do well while the weather is cold and wet. If I need something different when it gets warmer, I’ll deal with that when it comes.

Now, with my waterproof gear in hand I feel like the king of the world, ready to tackle any kind of weather head on. Nothing can stop me.

So in the early morning I put on my short-sleeved cycling shirt, arm warmers, short cycling pants, the waterproof stuff and my shoes and socks.

Fenders Help, to a degree

I figured that my new fenders would keep so much water off my shoes that they would not get wet.

Of course if there is no more spray from the road, everything will remain dry.

Well, not quite.

The fenders help to keep the grit and grime from the road off yourself and the bike. And they do this amazingly well. Even at the end of the ride when I washed the bike off there was almost no grit on anything. The best part was that although the chain was wet, it was not dirty, which is a definite plus for longevity.

Anyhow, my shoes were not waterproof and with just the rain on them, they were soaked within an hour. But I’m used to that so no big deal.

Danshui then Bailaka Rd.

So off to Danshui. The ride was pleasant enough, just the usual slog through the city.

Follow the No. 2 then after a bit of an uphill, right onto the 101. Even at this time of the night there were a few cars around on this road that seems like it should be quiet. It’s probably worth noting that this is likely because many people live around the Danshui area, where property is cheaper and there is access to the end of the subway system.

Some gentle climbing and finally the right turn onto the 101A.

Shiver

I had estimated that this section of road would be pretty well maintained and in good shape for taking a ride all the way to the top.

And it turned out that I was almost right. With no cars and a well maintained road surface the climb was proceeding at a decent pace, although I couldn’t tell how fast I was going, just a decent pace for a long and easy-paced ride.

Slowly but surely the lights starting becoming further and further apart. The faint glow of the next one around the corner being the only sign of anything ahead. Until there were no more. Absolutely none. Except for the odd one lighting the entrance to a house where the occupants had long ago gone to sleep with a fluffy, cozy pillow and duvet to keep them snug.

Always Check the Batteries

So as I’m slogging up the climb and the lights have gone out I’m following the faint glow of my light, which I only then realize I forgot to change the batteries.

But remember, I was prepared, and feeling like superman, so I pressed on.

Until my light was almost gone. Nothing, nada, the moon through the clouds giving more light than the tiny glow of the three LEDs.

The Freeze

But the dim light by itself might not have dissuaded me from continuing, except that the temperature had dropped. A lot.

My toes were going numb, although they could still move, they were very cold.

My fingers were freezing.

Even my body inside the waterproof jacket was getting cold.

After passing under the archway on the way up I was hit by a strong wind that just shattered all my hope of getting over the top and gave me a deep sense of worry for my own safety.

So I turned around.

On the way down it was so cold and my light was so dim I couldn’t maintain more than 10km/h at the absolute max, probably less than 5km/h actually.

The Temple

I had to seek refuge. Too cold and too slow to continue I decided I needed somewhere to wait for sunrise and make a quick decent down the mountain.

So when I next caught a glimpse of a light on the way down I took my chance, with everything on my body losing heat I decided that this would be my refuge.

I climbed the three short sets of white steps to the entrance, parked my bike under the cover then proceeded to keep myself warm.

I removed my shoes and socks because they were colder in there than when they weren’t. Later on I found some gumboots around the back that I borrowed to try keep my feet warm.

I pulled my arms into the jacket and slipped my hands under my armpits. I pulled the jacket as far up my head as it would go, sat down on the ground with my back against the wall. And waited.

For three hours.

I napped four times during those three hours. Trying to keep as warm as possible, but shivering most of the time.

Just me and the continuous groan of the recording of monks chanting the “amitofo” song. And the view of the area of lit road by the bottom of the stairs. And the buddha looking staring at me from the back.

The Sun

Finally, the light through the mist signaled my departure and I put on my cold socks and shoes and headed down the mountain as quick as I could.

I took two breaks to breath warm air onto my fingers which were getting frozen enough to hurt. But once back to the 101 it was just quite cold and wet.

Lesson Learned… Hopefully

At the end of it all I thought I was well prepared, but I wasn’t.

I didn’t have enough warm clothes. I didn’t have enough waterproof stuff, namely good gloves and waterproof shoe covers.

And I don’t have a good enough light. Which is where my focus is going to fall next.

Pinglin, Shuangxi and Pingxi

Mist over Pingxi

Took a very long ride through the quieter roads out of Taipei. 100km with 3 peaks of 400m and two 600m.

Shijhr to Shenkeng

The first peak is on the 109 leading from the Academia Sinica near Nangang, weaving up the hill, then dropping to Shenkeng on the other side. The road is wide and well-paved all the way up. There’s not much to see, but it is well lit at night and there are not many cars, even at at rush hours. The quick descent down the other side is best tackled heading in wide and keeping off the brakes, the corners are tight, but not so tight that you’ll need to slow down much.

Once down the other side, take a left and then the first right, over the bridge to the other side. Then head left on the 106B. Continue until you pass under the freeway then head right.

The 106B and Shrding

The set of convenience stores just ahead are the last you’ll see for 20 or 30km so get anything you need before heading up the right fork in the road.

There’s a short section after the convenience stores without houses. When you see houses again you’ll hit a fork in the road, take the left fork, even though it looks smaller than the right. There are no more intersections until Pinglin. From this point on you’re climbing for a while, quite a long while. The first half of the climbing section is under the faint, orange light that lights the freeway above. Although the road itself is lit, lights become sparse towards the peak. The university on this hill has meant the roads have been improved, which my colleague told me were very small only 10 years ago.

There are good views from the top which I was unable to capture (night + bad camera).

Heading down the other side they obviously ran out of money because the road is narrow, with many sections under repair. There are almost no lights, but also no traffic. Take it easy down this part, especially the sections which are not wide enough for even two cars.

Pinglin to Shuangxi

At the bottom you are pretty close to Pinglin, which is apparently a fairly decent place to go visit. There’s also a 7-11 there if you need anything. Head right if you want to take a look, but to continue the ride, head left.

This stretch of road is one of those beautifully untouched roads around Taipei. There are few cars. To the left are the hills, dotted with tea fields and the occasional temple or two. To the right the hills stretch down to the valley below, covered in a eary mist that gently rests on the river at the bottom. There were absolutely no cars between here and Shuangxi at the other end, so approximately 30km without any cars or signs of life whatsoever, apart from the occasional dog barking (not chasing) or bird singing in the trees. At two points there are roads that head directly over the hills to the North that connect with the 106, taking either of those gives a shorter option if pressed for time.

For the longest option, just continue on the lower road.

The road winds slowly upward along the contour of the hill. The whole road is lined with trees and views of the green lush hills to every side. Only a stone’s throw from the hustle and bustle of the big city you can be surrounded by the relatively untouched beauty of Taiwan’s countryside.

The 106

Unfortunately the road comes to an end and two options are available, with very different lengths. I took the shorter which goes left back to the 106 through a 2km tunnel. The 106 is quite nice, but a bit of a shock with very many more cars. This bridge was obviously there a bit before the one I was riding on.

A bridge nearby Pingxi

At the other side is a tranquil pool. Anyone for a swim?

Small pool in Pingxi

But coming up was the final, short and steep climb back to the Shijhr side of the mountains.

Dingnan Road

The final road is almost abandoned. It looks like it’s only used by people who live on the hill. It’s very peaceful and extremely close to Shijhr. Actually if you’re looking for a super-steep hill, this is one that’s hard to beat. Once at the top there is a turnoff to the right that makes a mad climb which I use the granny gear on my MTB to get up.

You’ll pass a temple with some nasty dogs to keep you moving fast. They don’t sound friendly.

Just beyond that there’s a lookout spot with great view of Taipei.

Hill by my house

Take the first left and you’re on a downhill that will definitely test your brakes. My discs brakes get to the point where they sound like they’re glazing over only this section, be careful.

Once back in the big city just head on home.

And start dreaming about the next trip out.

Conquer the Rain: The F Word

Rear fender & mud flap

They beat me to the ground, kicked me aside and called me a “wuss”, but inside I was warm and smiling.

As far back as I can remember there has been a stigma against certain bike parts. Bits of bicycle artillery that through poor development, genetic disposition, social stigma or just plain bad luck, have permanently slipped away from the realm of “real” cyclists. Bicycle indicator lights, rear view mirrors, bells, horns, even full panniers are seldom seen on bikes ridden by “serious” cyclists. To install such things would lose friends and possibly end if physical harm for offending those higher up the coolness ladder.

But are those things really so uncool?

Being stuck inside on rollers because of the rain is not fun and it’s been like that for a few weeks now. It’s been at least a few weeks since I managed a long ride and it’s depressing. But how can I get out in the rain?

Traditional Wisdom

Traditional answers to riding in the rain have proved lacking.

Just get wet is the first choice. You’re hard, just stick it out, be tough. Uh, sorry but suffering for nothing doesn’t make sense. Works fine if it’s balmy 30C outside, but not when it’s getting to the low teens. Staying dry is also helps keep warm.

So keep dry. A whole slew of waterproof gear is available, but with high-tech materials like GoreTex, you’re pushing big budgets for a full set of gear. But you’re still getting really wet, and simply holding the enemy at bay.

On the cheaper end, a 7-11 disposable raincoat actually does a pretty damn good job at keeping the upper body dry. Underneath that plastic bag almost any combination of layers of clothing will warm you up enough. But what about the legs?

Legs just aren’t designed for being wrapped in bags. Feet can handle bags, but they will wear through in less than an hour or two or solid riding in the wet and rain. Once the water seeps in, all is lost. They will not dry, even if you ride them in the glorious light of the warm sun for the rest of the day. And legs will get drenched, the splash from the front wheel spraying up covers the legs and deposits most of itself on your shoes. Same goes for the spray from the back wheel that will strike the seat tube and join forces with the evil front spray to thwart even your boldest efforts at keeping dry.

But what if you could keep the rain from reaching you in first place? What if instead of hand to hand combat against the foe, you could simply lift the drawbridge and leave him shouting at you in your safe haven? What if all our current schemes have been fatally flawed from the start?

The Hero

The hero of our story arrives. In gleaming armor he steps up to claim his honor.

But he needs some introduction, because he has been neglected and put aside for quite a while now. Now, bikes in Taiwan are used much more as commuting machines than back in South Africa, flat roads and close proximity to the places you need to go make it very easy to do a short ride instead of a long walk. They’re also very cheap and practical, keeping them well clear of the fads that sweep the world of fancy bikes.

Bells are cool, flat pedals are cool, single gears are cool, low prices are cool, racks are cool, front baskets are cool, upright riding positions are cool and so are… fenders.

Another angle

And as it turns out, the fender is the long-lost hero and the key hours of unadulterated pleasure in the rain. This unsung hero will stop almost all the water before it even gets to you. Clean little raindrops are an easy force to deal with when the onslaught of streams of muddy grime don’t even make their way into the picture.

So that is my next accessory. I’m gonna geekify my ride, add long mud flaps and just kit my beast out with the most killer rain-stopping accessories known to mankind. They’re still in the works, but when they’re done I’ll have a full report back. I’m looking forward to some seriously geeky fun.

I might never be cool again, but that’s okay, ’cause it will be a “happily ever after”.

[Here’s a nice link about fenders http://www.sheldonbrown.com/fenders.html. And a design for mudflaps linked to from there http://phred.org/~alex/bikes/fendermudflap.html ]

First image credit, Second image credit

Taiwan North Coast Cruising

The North Coast is rewarding ride around the north coast of the island. Easily reachable from Taipei or Keelung, and making a nice loop if wanted it offers sea views and quietish roads.

I start this ride in Sijhir and head west through Donghu then on to Shilin and Danshui. The first section from my house to there is the usual city stuff, but in the morning it is quiet enough. The roads are still busy as there are very few alternative routes when travelling to Danshui from the city.

Sometime before Danshui the No. 2 heads off Northwards over a few rolling hills, nothing very steep. These can be avoided by instead continuing to Danshui and sticking to the coast more, however Danshui is fairly busy most of the time. The last time I tried this alternative and stuck to the coast I got slightly lost, but managed to find my way back to the No. 2 in the end, just head northish.

The road continues with only slight rolling hills, there’s usually very little wind and when summer comes around that little wind would certainly be appreciated. It’s at this part where you will start to see the groups of university students out on their scooters. Unlike the middle Taiwan scooter hooligans, these groups are mostly guys on their scooters with their girlfriends on the back. There’s a good chance you will bump into the same groups a few times as they pass ahead, stop to enjoy a site where you’ll pass them, and then they’ll pass you later as you continue onward. I’ve managed a maximum of three leapfrogs in this manner.

When you hit the most Northern part you can see the sea, which, after being stuck in the city, is nice in itself. There is an area for kite-flying, or so is depicted on the large painting on the wall holding back the mountain and landslides. There’s a large rock with a big hole in the middle that I noticed for the first time on this ride, I’ll take a picture next time.

The riding from here is pleasant until you read Wanli.

The section from Wanli to Taipei is not very nice. There are lots of cars, lots of motorbikes and would be considered only slightly more pleasant than inner-city riding. Weekends might be different, but during the morning rush it’s pretty busy. There is an alternative, which I’ve read is really good, to go over the mountain from Wanli to Sijhir which I’ve never tried, but could save you the headache of going through Keelung. I at least know the last part of that alternative is a really quite road for the most part.

This is certainly my favorite metric-century ride and is a nice loop. Nice views, pleasant weather and generally flat riding.

Here’s a map of the ride.

View Ride (102 km) – Taiwan North Coast in a larger map

How to Repair Shimano Cycling Shoes

My Shimano cycling shoes have taken quite a beating over the years. A month or so ago the hard, plastic sole started breaking from the leather uppers.

I was a little disheartened, but decided that the simplest fix would probably be the best. I had some electrical tape wrapped around my shoes for a few days to stop further separation.

Here’s the steps I took:

  1. Buy shoe glue. The type I bought simply had a picture of a shoe on it, so I just bought it. This glue was KS Brand and labelled as “Chloroprene“.
  2. Open up the areas to be glued as much as possible. I don’t recommend opening parts that are still firmly glued.
  3. Dust off the surfaces. Wipe with a paper towel, or in my case I just used my finger to wipe off dust and dirt.
  4. Apply glue to both surfaces (keep them apart for now) then allow to dry for 10-15 minutes.
  5. Carefully align surfaces then press together firmly for a minute or two.
  6. Leave for a few hours to fully dry. Use heavy objects to continue to apply pressure to those spots that need it.

I went on a 100km ride the morning after fixing these, so a long cure time is not really necessary. So far they are holding out, there are no obvious signs of further separation.

You’ve just saved yourself a bundle of cash and extended the life of your beloved shoes.

Next step: go ride your bike. Cheers.

The Secret to Waking Up Early

My secret weapon was constructed in undisclosed factory deep in the Chinese territory. My informants tell me that Winnie spent over six months perfecting the swinging action and learning to lip sync to the entire song. These are the final results.